To use passkeys on iPhone, you set a device passcode, turn on iCloud Keychain and AutoFill, then create a passkey from the sign-in screen of the website or app you want. After that, signing in means a glance at Face ID instead of typing anything. Most of it takes about five minutes, and almost all of the work happens inside the service’s own sign-in page rather than in Settings.
Most of the confusion comes from one thing: a passkey is not a password, and it is not the six-digit code that arrives by text. It is a login credential that lives on your iPhone, unlocks with Face ID or Touch ID, and syncs to your other Apple devices through iCloud Keychain. That last detail answers the question people ask most often on forums — you do not need the iPhone you created the passkey on.
Below I’ll walk through the whole process, including the menu paths, the parts that differ between iPhone and iPad, and what to do when a passkey prompt simply doesn’t appear.
Table of Contents
- 1What is a passkey?
- 2What You Need Before You Start
- 3How to Use Passkeys on iPhone, Step by Step
- 4Step 1: Check that your iPhone is ready for passkeys
- 5Step 2: Create a passkey in a website or app
- 6Step 3: How to sign in with a passkey on iPhone
- 7Step 4: Find and review saved passkeys
- 8Step 5: Rename, share, or delete a passkey
- 9Step 6: Troubleshoot when a passkey is missing or does not work
- 10Using Your iPhone Passkey on a Mac or Windows PC
- 11Common Mistakes and How to Fix Them
- 12Trying to use a passkey on a service that doesn’t support one
- 13Expecting a passkey to sync without iCloud Keychain
- 14Mixing up a passkey with a one-time code
- 15Deleting a passkey before checking the account
- 16Confusing sign-in with password reset
- 17Forgetting that Touch ID devices behave the same way
- 18Frequently Asked Questions
- 19Do passkeys replace passwords on iPhone?
- 20Do I need an internet connection to use a passkey?
- 21Do passkeys work across all my Apple devices?
- 22What happens to my passkeys after I change iPhones?
- 23How do I get into my account if Face ID stops working?
- 24Why can’t I find my passkeys on my iPhone?
- 25Conclusion
What is a passkey?
A passkey is a digital login credential stored on your iPhone instead of a typed password. It uses Face ID, Touch ID, or your device passcode to sign you in to apps and websites, and it syncs across your Apple devices through iCloud Keychain.
Under the hood, your iPhone holds a private key that never leaves the device, and the website stores a matching public key. When you sign in, the site sends a challenge, your iPhone signs it, and the site checks the signature. There is no shared secret in the middle, so there is nothing for a fake login page to steal.
That design is why passkeys survive breaches and phishing attempts better than passwords. There’s no password to reuse across sites, nothing to type into a convincing fake page, and nothing to forget.
What You Need Before You Start
Apple has shipped passkey features across several iOS releases, and the menu names shift a little between versions. Here’s what has to be true before any of the steps below will work.
- An up-to-date iPhone. Passkeys arrived in iOS 16. The separate Passwords app, where you review and manage passkeys in one place, arrived in iOS 18. On anything older than iOS 18 you’ll manage passkeys through Settings instead.
- A device passcode. Go to Settings > Face ID & Passcode (or Touch ID & Passcode). A six-digit passcode is the minimum, and a longer alphanumeric one is stronger. Without a passcode, Face ID can’t be used and passkey setup stops dead.
- Face ID or Touch ID turned on. Same Settings screen. If you use an Apple Watch to unlock, your iPhone still needs its own passcode set.
- iCloud Keychain switched on. Open Settings, tap your name at the top, then iCloud > See All > Passwords & Keychain. Turn on Sync with this iPhone. This is what carries passkeys to your other devices.
- AutoFill enabled. Settings > General > AutoFill & Passwords > turn on AutoFill Passwords and Passkeys and pick iCloud Keychain as the source.
- A supported website or app. Passkey sign-in is offered by the service, not by your iPhone. Most large services now offer it, and many offer it only on the browser or app version you’re already using.
If Face ID fails after several tries, your iPhone falls back to the device passcode automatically, so you are never locked out by a failed scan. If you’d rather set up the passcode itself first, the walkthrough below is the quickest route.
How to Use Passkeys on iPhone, Step by Step
Step 1: Check that your iPhone is ready for passkeys
Open Settings > General > Software Update and install anything waiting. Then confirm your passcode is set under Face ID & Passcode, and check that iCloud Keychain is syncing.
How do you know it worked? Open Settings > General > AutoFill & Passwords. If AutoFill Passwords and Passkeys is switched on and iCloud Keychain is selected beneath it, you’re ready. On iPad the path is the same; on Mac the equivalent lives in System Settings > General > AutoFill & Passwords.
Step 2: Create a passkey in a website or app
You create passkeys from the service’s own account screen, never from Settings. Open the app or website and start the sign-up or sign-in flow until you reach the options list.
On a new account, most services show a button reading Continue with a passkey or Sign in with a passkey. Tap it and iOS asks you to name the passkey — the service name is usually filled in, and you can edit it to something like Google Passkey so it’s easy to recognise later.
Confirm with Face ID or Touch ID, then tap Done or Continue. If the service offers to save it, say yes; if it doesn’t ask, nothing is wrong, because the passkey is already stored.
On an existing account, expect a different route. Look for Settings > Security, Security & Privacy, or Passwords within the account menu, then an option like Add a passkey. Some sites force you to set a password before they let you add a passkey, so if you don’t see the option anywhere, that’s usually why.
How do you tell it worked? The account’s security page now lists the passkey, and the name appears in the Passwords app under the service.
Step 3: How to sign in with a passkey on iPhone
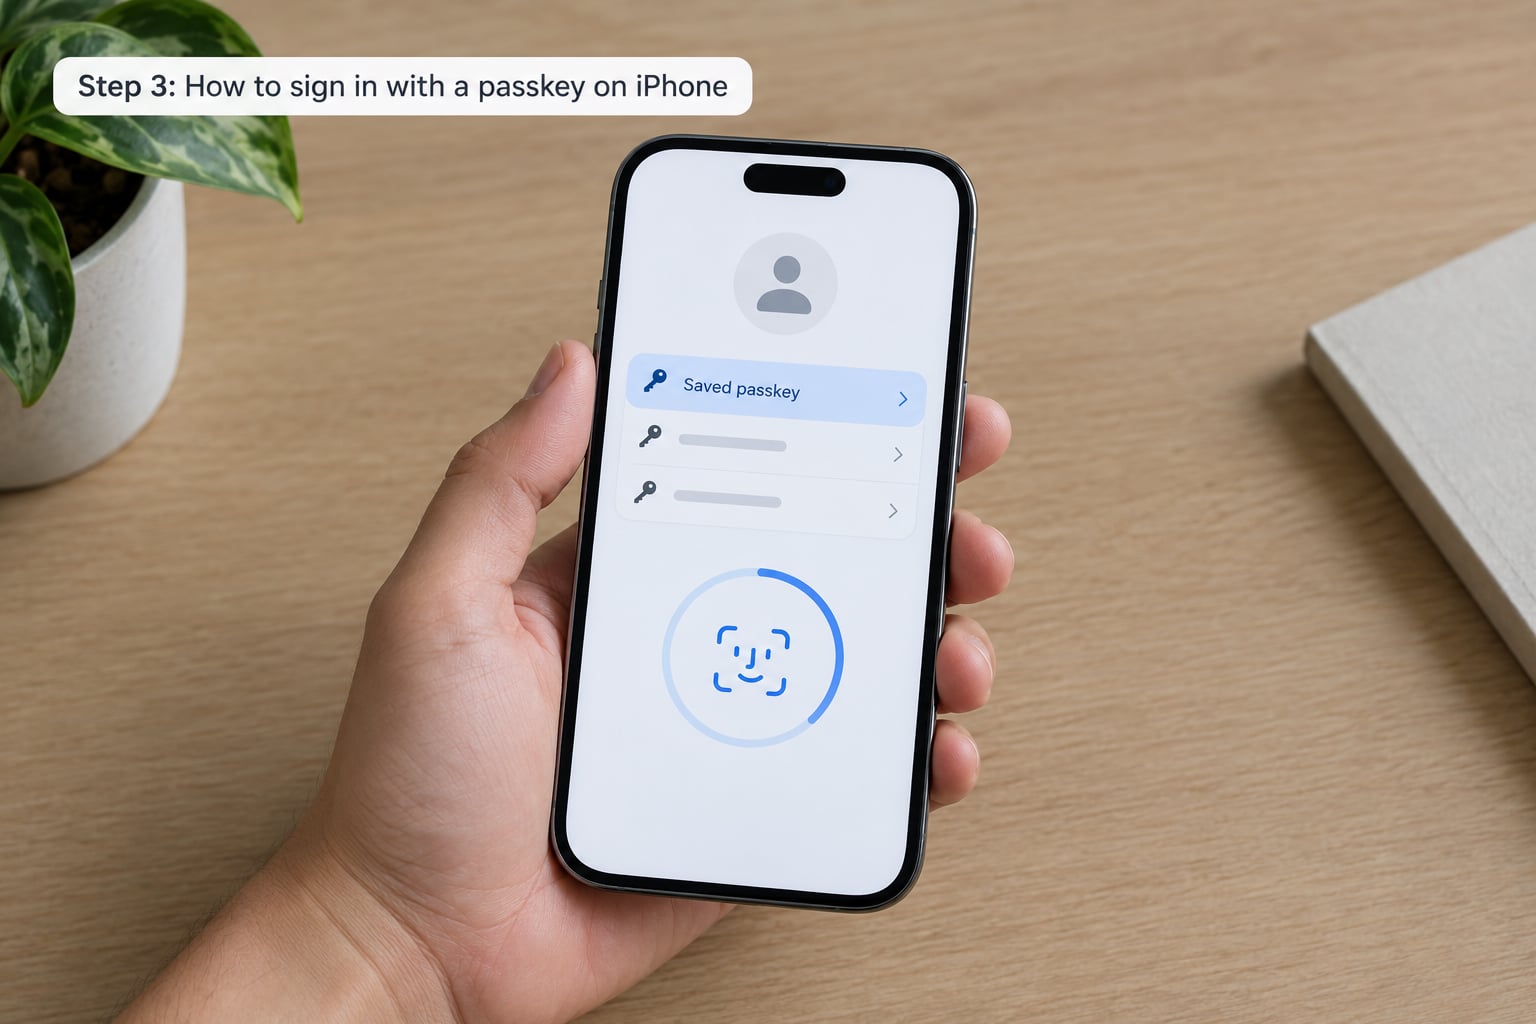
Open the app or site and tap Sign in. You’ll see the usual email field, plus the saved accounts and passkeys listed above it.
Tap your passkey. On a recent iOS release you may need to tap Other Options first if the passkey isn’t listed straight away, then choose Passkey from nearby device or Use Face ID. Look at your phone to confirm, and you’re in.
If the service still shows a password box, the passkey option is usually hidden behind that Other Options menu, or the service doesn’t support passkeys for that particular sign-in screen.
Signing in this way takes about two seconds and works the same on iPad. On a Mac the prompt appears directly; on a Windows PC you’ll need the nearby-device flow covered in the next section.
Step 4: Find and review saved passkeys
On iOS 18 and later, open the Passwords app. Scroll past the codes and passwords sections to Passkeys, then tap any entry to see the website or app it’s tied to, the date it was created, and who it’s shared with.
If you can’t see a passkey you just created, check that you’re signed into the same Apple Account on this device. On older iOS versions, look in Settings > General > AutoFill & Passwords > Passwords, or in the website’s own security settings — some services keep their own copy of the list.
One small habit worth keeping: when you review a passkey, confirm the service name matches. A passkey named after a lookalike site is a red flag worth deleting.
Step 5: Rename, share, or delete a passkey
Open the Passwords app, tap into the passkey, then tap the three dots in the top corner. Rename it, share it to another Apple device through the standard sharing sheet, add it to a shared Family Sharing group, or delete it.
Before you delete anything, check the service. Removing a passkey from your iPhone doesn’t necessarily remove the account, and on some services the only remaining way in is the password or a recovery code. Take a screenshot of the service’s security page first if it’s an account you rely on.
If you need the old device gone for security reasons, delete the passkey remotely from the service’s security settings rather than only on the phone.
Step 6: Troubleshoot when a passkey is missing or does not work
Work through these in order — they cover nearly every case.
- The prompt never appears. Confirm AutoFill Passwords and Passkeys is on, iCloud Keychain is syncing, and the service supports passkeys on that screen.
- Passkeys missing from the Passwords app. You’re probably on the wrong Apple Account, or the device hasn’t finished syncing. Pull down to refresh, then check Settings > [your name] > iCloud > See All > Passwords & Keychain.
- Face ID keeps failing. Wipe the screen, check nothing is covering the sensor, and make sure Settings > Accessibility isn’t set to require attention. After several failures the passcode prompt takes over anyway.
- The app says the passkey is invalid. Quit the app fully and reopen it. If it persists, delete the passkey and create it again — this happens after a service rotates its keys.
- You’re on Android or Windows. Your iPhone passkey still works through the nearby-device QR code flow, provided Bluetooth is on.
- You erased the phone. Passkeys synced through iCloud Keychain come back on sign-in. Device-only passkeys do not, so use the service’s recovery flow.
Using Your iPhone Passkey on a Mac or Windows PC
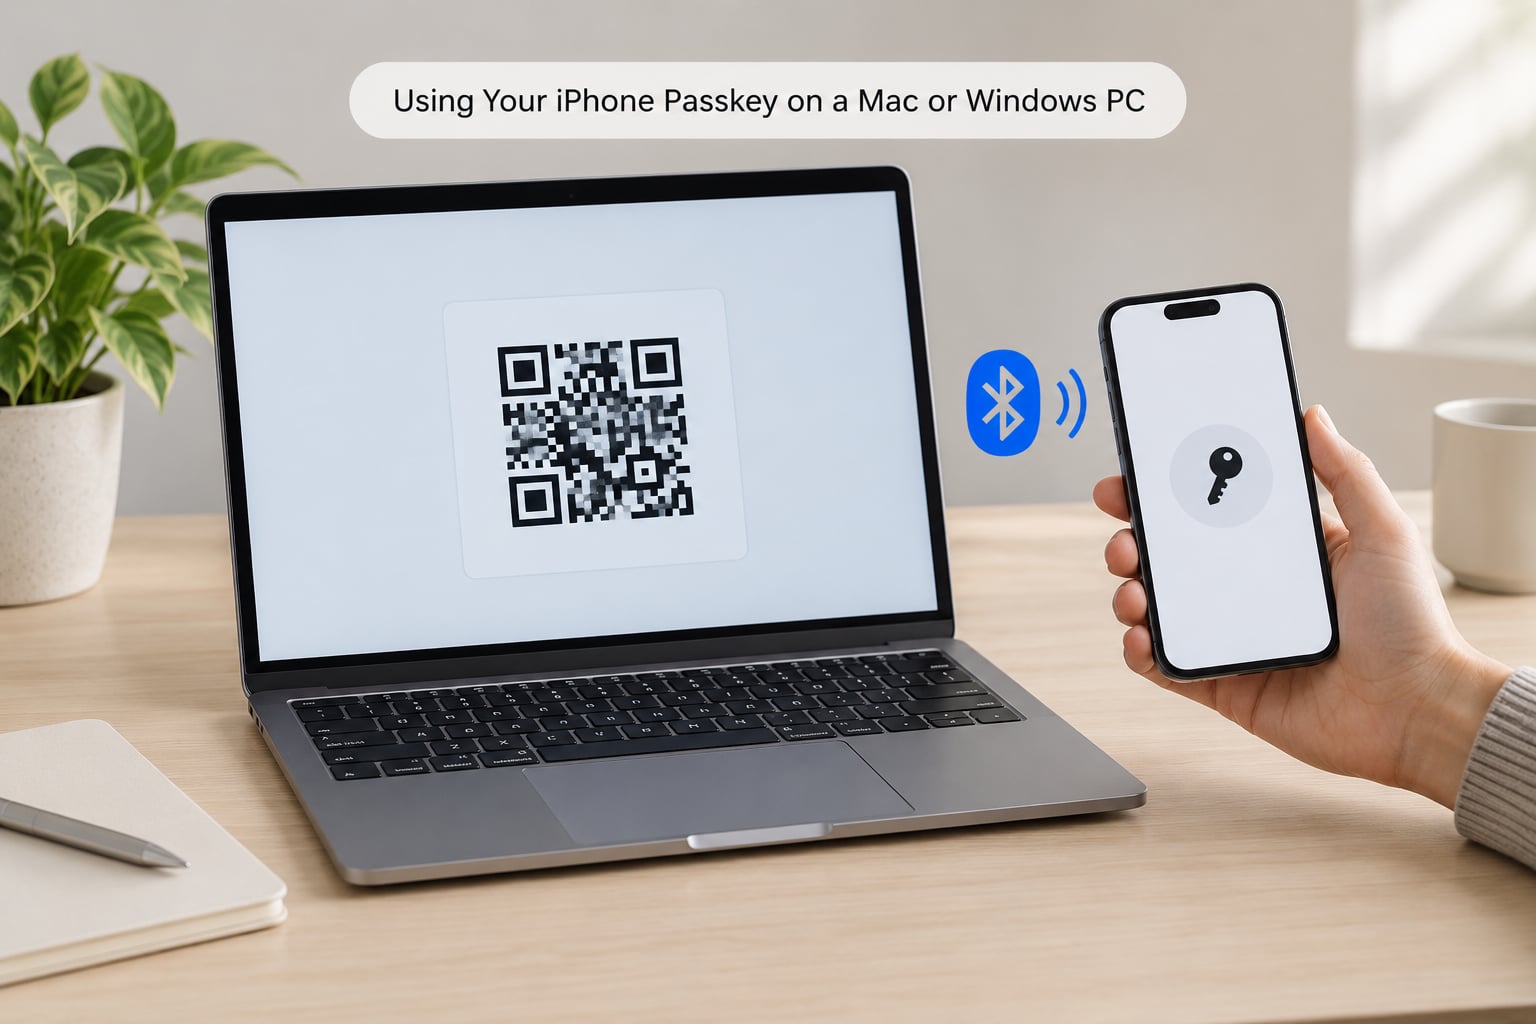
This is the question that comes up most on forums, so it’s worth spelling out. When you tap Sign in with a passkey on a Mac or Windows PC, the page offers a QR code rather than a list of saved keys.
Open the Passwords app on your iPhone, tap the three dots in the top corner, and choose Scan QR Code. Point the camera at the code on the computer screen. Your iPhone then asks for Face ID or Touch ID, and the computer signs in.
Bluetooth has to be switched on for this to work, which surprises people who keep it off to save battery. If the QR code does nothing, that’s the first thing to check. On Mac the flow is smoother because the devices are already nearby.
Windows PC users also see a Passkey from device option on Windows 11, which skips the QR code entirely and uses the same iPhone confirmation.
Common Mistakes and How to Fix Them
Most of these come from treating a passkey like a password with extra steps.
Trying to use a passkey on a service that doesn’t support one
Your iPhone can only offer what the service implements. If no passkey option appears anywhere in the account flow, no amount of Settings tweaking will add it. Look for the service’s own support page or fall back to its password and two-factor login.
Expecting a passkey to sync without iCloud Keychain
With Keychain syncing, your passkeys follow you to new devices. Without it, they stay on the phone that made them, and erasing that phone means losing them. Turn on Settings > [your name] > iCloud > See All > Passwords & Keychain > Sync with this iPhone before you rely on a passkey for anything important.
Mixing up a passkey with a one-time code
A code that arrives by text or email is temporary and typed into a box. A passkey is stored, and you confirm it with Face ID. If a screen is asking you to type digits, that’s a code, not a passkey.
Deleting a passkey before checking the account
On services that offered only a passkey at sign-up, deleting it can leave the password field empty and unreachable. Open the service’s security settings on a device you can still log into first, and confirm a password or recovery method exists.
Confusing sign-in with password reset
Signing in proves your identity. Resetting a password changes the credential and usually goes through a separate flow that checks email, phone, or recovery contacts. A passkey can’t be used to change a password — it can only open the account, where you can then make the change.
Forgetting that Touch ID devices behave the same way
If your iPhone has a home button rather than Face ID, the prompts say Touch ID instead, but every step is identical. Nothing is missing because the wording differs.
Frequently Asked Questions
Do passkeys replace passwords on iPhone?
A passkey replaces the password for services that support it, but it doesn’t erase everything at once. Most major sites let you add a passkey to an existing account and keep the password as a fallback. Some newer accounts are passkey-only, where there’s no password to go back to. That makes deleting the passkey more serious than it sounds, so check the account’s security page before you remove anything.
Do I need an internet connection to use a passkey?
Yes. Passkey sign-in is an online authentication, not an offline one. Your iPhone contacts the service to send the challenge, then returns the signed response. With no connection, the prompt either never appears or times out. The one partial exception is unlocking your Apple Account on a device you already own, which can use an on-device path.
Do passkeys work across all my Apple devices?
They do, as long as iCloud Keychain is syncing. A passkey created on iPhone appears on your iPad and Mac after they sign into the same Apple Account, with no re-setup needed. If it doesn’t appear, check the Passwords and Keychain sync switch on the device you’re trying to use it on, then sign that device out of iCloud and back in to force a refresh.
What happens to my passkeys after I change iPhones?
Synced passkeys come back automatically once you sign into the same Apple Account on the new phone. Passkeys stored only on the old device do not transfer, which is why keeping iCloud Keychain switched on matters. If a passkey is missing after the move, check the service’s security settings on the new phone and create it again while you’re still logged in somewhere.
How do I get into my account if Face ID stops working?
Use the fallback. After several failed attempts at a Face ID prompt, your iPhone asks for the device passcode instead, and a passkey will work with that passcode just as happily. If the passcode itself is forgotten, an incorrect passcode entered many times in a row eventually offers the option to erase the device, and passkeys in iCloud Keychain return after you sign back in.
Why can’t I find my passkeys on my iPhone?
Three causes account for most cases: you’re signed into a different Apple Account than the one you created the passkeys with, iCloud Keychain sync is turned off, or your device is on iOS older than 18 and you’re looking for the Passwords app that isn’t there. Open Settings [your name] iCloud See All Passwords and Keychain and confirm sync is on, then check the service’s own security page as a cross-reference.
Conclusion
Start with three things: update the iPhone, set a device passcode under Face ID & Passcode, and confirm iCloud Keychain is syncing plus AutoFill Passwords and Passkeys is switched on in Settings > General > AutoFill & Passwords. With those in place, open a service you already have an account with, choose the passkey option on its sign-in screen, confirm with Face ID, and you’re done.
Leave the password in place for now. Once you’ve used the passkey a few times and can see it sitting in the Passwords app, that’s when it’s worth removing anything.